Mobile integration
iOS SDK Integration
In this section you will find information on how to integrate the MobSur SDK in your native iOS application.
Prerequisites
- Supported Destinations: iPhone and iPad
- Minimum version of iOS: 12
- Minimum version of Swift: 4.0
Installation Guide
The recommended type of integration is with the Swift Package Manager.
Alternatively, you can download the .xcframework file and manually import it in your project.
Option 1: Swift Package Manager installation
Swift Package Manager is recommended by Apple way of including third-party libraries in your project. The process is quick and easy, and you can update the SDK with just a simple click.
Integration steps:
- Open your project or workspace in XCode
- On the main menu select File → Add Packages…
- In the Package Manager, you should paste the SDK URL in the search bar. https://github.com/eden-tech-labs/MobSur_iOS_SDK
- And click Add Package in the bottom right corner.
- Then proceed to the Integration Guide
Option 2: Using Cocoapods
If this is your first pod dependency, follow the instructions on cocoapods.org If you already have Podfile in your project you should add the following:
target 'YourAppTarget' do

    #Other Pod related information

    pod 'MobSurSDK', '~> 1.0.3'
end
After that open the console, navigate to the project directory and run pod install The pod should be installed and you can proceed to the Usage section of this document.
Option 3: XCFramework installation
This type of installation is suitable if you want to keep everything related to your project local and do not depend on the network traffic.
- Download the latest release from our repository
- Extract it so you can see
MobSur_iOS_SDK.xcframework - Open your project or workspace in XCode
- In the Project Navigator (shortcut ⌘ + 1) make sure you see the
Frameworksfolder under your project. - Drag and drop the extracted
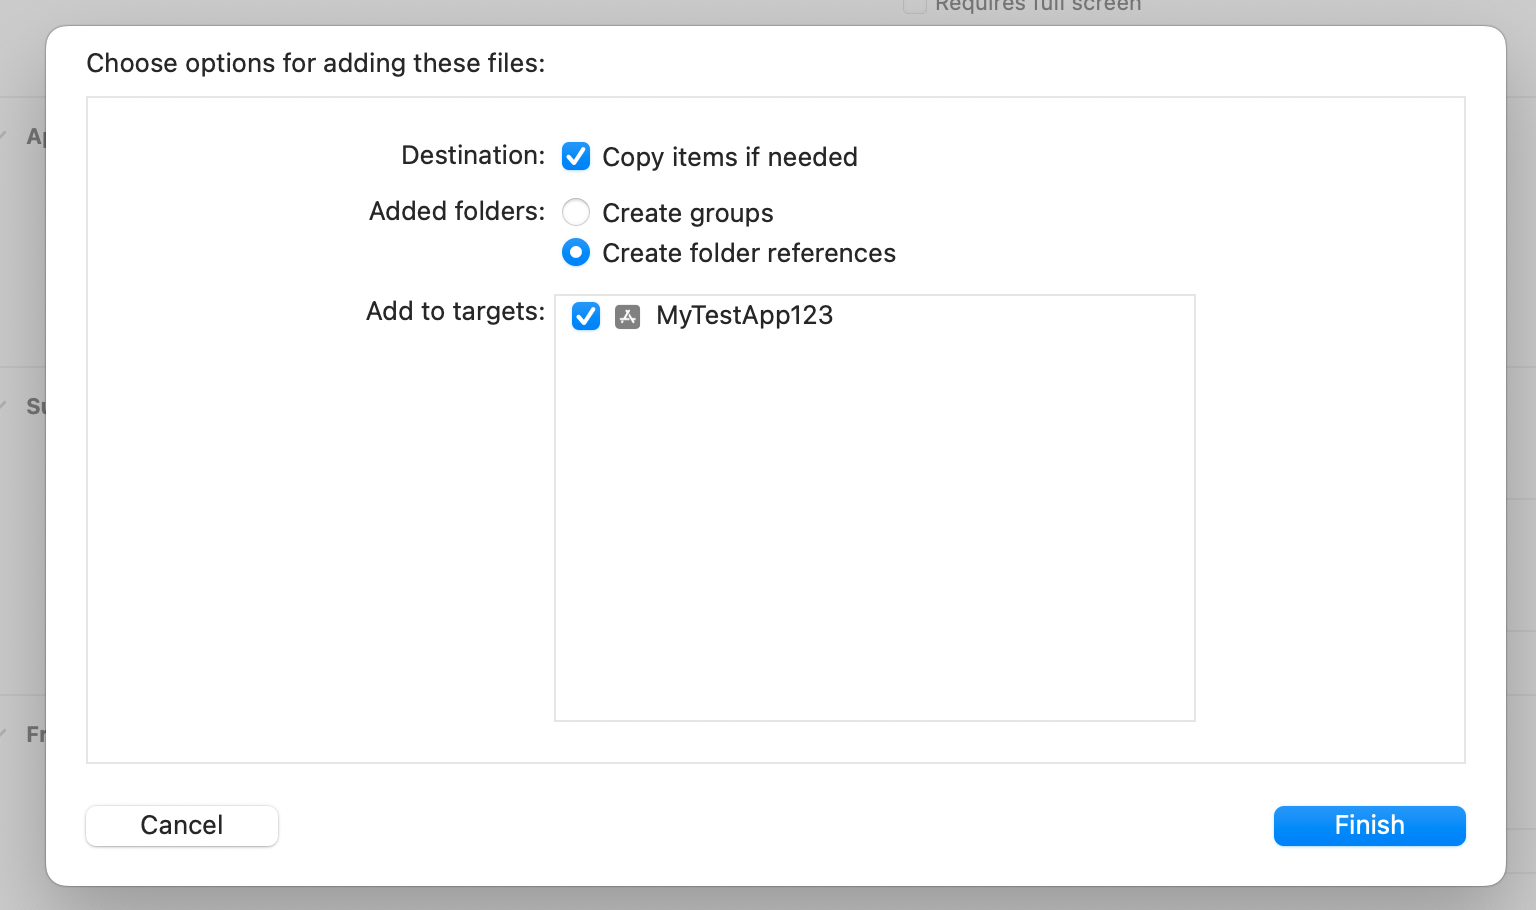
MobSur_iOS_SDK.xcframeworkin theFrameworksfolder. - In the newly opened window make sure your target and Copy items if needed are selected.
- Click the Finish button.
Integration Guide
After you’ve completed one of the installation steps above, you should have the MobSur SDK in your project. The next step is to initialize it and show your first survey.
Initialization of the SDK should be done as early as possible in your app initialization, but the right place depends on your project and its’ needs.
It’s a good practice to do this in the AppDelegate so the event tracking may start as soon as possible.
App ID!
You can get the App ID from the MobSur Dashboard.
More information is available here
If you are using UIKit
Open your AppDelegate file and add the initialization code in the didFinishLaunchingWithOptions method.
Do not forget to import the SDK in the beginning of the file import MobSur_iOS_SDK
The user id is defined by you and it is used to distinguish different users, answering the surveys.
import UIKit
import MobSur_iOS_SDK

@UIApplicationMain
class AppDelegate: UIResponder, UIApplicationDelegate {

	func application(_ application: UIApplication, didFinishLaunchingWithOptions launchOptions:
	[UIApplication.LaunchOptionsKey: Any]?) -> Bool {

		// userID and debug are optional parameters!
		// If you do not know the user id at this point your can pass nil and set it later
		MobSurSDK.shared.setup(appID: "YourAppID", userID: "123", debug: true)

		// Remaining contents of didFinishLaunchingWithOptions method

	  return true
	}

// Remaining contents of your AppDelegate Class

}
If you are using Swift UI
import SwiftUI
import MobSur_iOS_SDK

class AppDelegate: NSObject, UIApplicationDelegate {
    func application(_ application: UIApplication, didFinishLaunchingWithOptions launchOptions: [UIApplication.LaunchOptionsKey : Any]? = nil) -> Bool {
        MobSurSDK.shared.setup(appID: "YourAppID", userID: "123", debug: true)
        return true
    }
}

@main
struct MobSur_iOS_DemoApp: App {

    @UIApplicationDelegateAdaptor(AppDelegate.self) var appDelegate

    var body: some Scene {
        WindowGroup {
            ContentView()
        }
    }
}
If you do not know the user id during initialization and/or when the user id is changed (logout/switch user) you should call the updateUser method. Do not forget to import the SDK in the beginning of your file import MobSur_iOS_SDK
func userLoggedIn(newUserId: String) {

	// Other login related logic...

	MobSurSDK.shared.updateUser(id: newUserId)
}
Right after you set the user id, the SDK will fetch the eligible surveys for this user. If you do not set the user id, you will not receive any surveys, regardless of what events you fire.
Launching your survey (Events)
MobSur surveys are triggered by events in your app. These events are identified by name which is of type String.
Event name!
The name of the event should be the same as the one in the Dashboard.
You can check it here
As a best practice, you should wrap all your event tracking in one class that sends them to all related services. This way you can reuse these events with other services and easily switch to another provider if needed.
class EventTracker {
	static func purchaseFinished() {
		eventFired(name: "PurchaseFinished")
	}

	private static func eventFired(name: String) {
		MobSurSDK.shared.event(name: name)
		// Other event related logic may go here
	}
}
You can extend it to fit your needs.
Here’s an example usage in a simple shopping cart view.
import SwiftUI

struct ContentView: View {
    var body: some View {
        VStack {
            Text("Cart overview")

						// Other important parts of your UI ...

            Button("Confirm my order") {
                EventTracker.purchaseFinished()
            }
        }
    }
}
In reality, the logic may be separated into other classes that manage the cart logic or other user behavior.
Troubleshooting
If you have done everything from the installation and integration guide, but you still do not see the survey you expect, you can check the following steps too.
- Make sure the AppID is correct.
- Make sure you have set the user id before firing the event that should trigger the survey.
- Try setting
debug: truein thesetupmethod and check the console for related messages
Sample project:
A sample project can be found in our GitHub repository.